Monday, October 31, 2011

Halloween Strike

One thing about being in the craft world is we plan SO EARLY for all our projects.  And by the time the holiday actually gets here, we are SOOOO over it.  So, that's where I am today.  I am boycotting a Halloween Blog Entry.  Happy Halloween!!!

But I will remind you that today is the final day to get a FREE BIG SHOT when you join Stampin' Up!  Whomever you join under, I hope you are as fulfilled with this job as I am!!

Sunday, October 30, 2011

Hanging Ornaments

Here is another card from my Christmas Lane Class.  Another very easy card.

Supplies: 
Stamp Set: Heard From the Heart
Ink: Cherry Cobbler
Paper: Christmas Lane Simply Scrappin Kit
Ribbon: Lucky Limeade Ruffled Ribbon
Tools: Ornament Punch
Accessories: dimensionals, glue dots, rhinestones

Everything else is stickers from the kit.

Saturday, October 29, 2011

Copy Cat

I admit, I copied this one exactly out of our holiday mini catalog.  It's found on page.26.  I didn't have that button or stamp set so I used what I had.

Supplies: 
Stamp Set: Tags Til Christmas
Paper: Christmas Lane Simply Scrappin' Kit, Old Olive, Early Espresso
Ink: Cherry Cobbler
Ribbon: Lucky Limeade Ruffled ribbon
Accessories: dimensionals, rhinestones

This was very each and quick to make.  I did end up using dimensionals behind the candy canes, b/c you all should know by now I can't make a flat card.  The rest of the card was made with stickers from our scrappin kit.

Friday, October 28, 2011

Some Christmas Lane Cards

Here is my favorite card from my Christmas Lane Class.  And, as my friends will tell you, the most time-consuming :)
Supplies:
Stamp Set: Pennant Parade (Merry), Bright Hope
Paper: Christmas Lane Simply Scrappin Kit, Early Espresso, Soft Suede, Cherry Cobbler, Whisper White
Ink: Early Espresso marker
Ribbon: Ruffled Lucky Limeade ribbon
Tools: Dotted Scallop ribbon border punch, Stocking Builder Punch, jewelry punch, 1/16" hole punch, square punch for ends of banner, corner rounder
Accessories: glue dots, baker's twine, mini jingle bells, glue dots, sticky strip, dimensionals

Card tips:  Here is a tutorial from Mary Fish on using the square punch to make pennant banners.  Stamp your "merry" on a scrap of white and then center it in the jewelry tag punch before punching it out.  It will center it everytime.  I did punch a 1/16" hole in the end of the jewelry tag to tie the baker's twine through.  Then I used a glue dot to put the jingle bells right below them.  For the ribbon, put a piece of sticky strip all the way across the card.  Lay your ribbon down until you get past the last stocking and then just start manipulating your ribbon.  Watch Mary here to get a better idea.   Hopefull you can see some small scallops on top and bottom of the strip of DSP.  I used our dotted ribbon border punch and just cut it down the middle to make 2 scallops and glued them behind the dsp.

Thursday, October 27, 2011

Christmas Lane Gift Tags

Here are the tags we made for the class.  I only used 1 die and it's called Two Tags.  How appropriate,

Supplies:
Stamp Set: From Santa
Paper: Christmas Lane Simply Scrappin Kit
Ribbon: Lucky Limeade Ruffled Ribbon
Tools: Big Shot, two tags die, 2-3/4" scallop circle punch, 1/8" hold punch, 1/2" circle punch
Accesories: glue dots.

Card tips.  On the christmas lights tags, it's hard to see, but there is a small red circle at the top.  For that, punch a 1/8" hole punch in some cherry cobbler.  Then, go back and put the 1/2" circle punch around it.  I don't know about you, but I can't punch in the center of something perfectly to save my life.  This works every time!  The rest of the stuff on the tags are stickers from the kit.

Wednesday, October 26, 2011

Great Christmas Lane Class

Well, I think I bit off more than I could chew on this class.  I enjoyed coming up with all the projects, but they did end up being time consuming...but I knew they would be.  Unfortunately, I think several of my friends left more stressed than when they arrived.  Stamping is supposed to be fun and carefree....so let me please apologize now.

Instead of starting with the cards, I'm going to start with the projects many people didn't get to or had a hard time with.

This is the sturdiest bow you will EVER put on a present.  Here is the tutorial I used from Splitcoast.  Hopefully this will help you.   Click here for the tutorial.

Tuesday, October 25, 2011

Kindergarten Craft

So, as the crafty mom in my son's kindergarten class, I am in charge of the Fall Celebration craft on Friday.  I didn't want to do something cheesy with construction paper.  Come on! I'm a SU! demo..I can come up with something better than that!  So, I did.  I knew I wanted to use SU! products, but I also didn't want a bunch of 5 year olds messing up my stamps...so I made my own.

I used our leaves #2 die and cut 10 layers of thin foam and glued them all together.  I needed them to be tall enough that I wouldn't need a handle for the kids to hold.  These ended up being plenty tall.


Then, I used some acrylic paint and a foam paint brush and painted the non-glittery side of each stamp and stamped the towel.  I think it turned out great and I think the kids are really going to love it.  It will be a gift for their moms so I'm sure the moms will appreciate not having to put another Popsicle stick picture frame on their kitchen counter :)


Thanks SU! for always allowing me to be the crafty one!!!

DON'T FORGET....1 more week to join SU! and get the Big Shot for free!!!!

Monday, October 24, 2011

Video Tutorials now FREE!

After a lot of thought, I have decided not to charge for my hair accessory video tutorials.  I'm happy to share them with you today  :)


Click here to see the tutorial on how to make the basic boutique bow.

Click here for the Christmas Bow

Click here for covering your headband.

Click here for the baby clippies

Click here for the fabric flower that goes on the headband

Click here for the birthday bow

I hope you enjoy all of those and please send me pictures of anything you make with hairbows :)

Happy BowMaking!!

Sunday, October 23, 2011

Going Geometric

Here's another card from Kim's class.
And directions :)

( I didn't do #1, but you certainly can :)

1.  Color White Organza Ribbon using sponge dauber and Bravo Burgundy ink; set aside to dry.
2.  Fold Old Olive Cardstock in half.
3.  Cut out 10 small triangles from Paisley Petal Designer Paper scraps using the Pennant Builder Punch; adhere to Bravo Burgundy piece as shown.  Emboss using the NEW Snow Burst Embossing Folder and Big Shot.
4.  Stamp Greeting from All Holidays set using Bravo Burgundy ink.
5.  Tie ribbon around Bravo Burgundy piece and adhere to card front using Mini Glue Dots.

Saturday, October 22, 2011

Party Hats

Here is the last card I made from Kim's class.  Another fun punch art idea for party hats!  Instead of the pennant punch, I used the square scallop punch to make the bottom of the hats.  It just seemed easier for me. If I had been at the class, I'm sure Kimmy would have showed me :)

1.  Fold Poppy Parade cardstock in half.
2.  Emboss Baja Breeze piece using the Polka Dot embossing folder and the Big Shot; adhere to card front.
3.  Use Pennant Builder Punch to cut out 1 hat out of each Just Add Cake Designer Paper scraps.
4.  Cut 1 scallop pennant from Poppy Parade scrap using the Pennant Builder Punch; cut 3 edges off and adhere      to bottom of each triangle; adhere to card front using Dimensionals.
5.  Add small Poppy Parade flower to the top of  each hat using Dimensionals.
6.  Stamp Greeting from Teeny Tiny Wishes set on Whisper White scrap; cut out using Scallop Oval Punch; sponge edges using Poppy Parade ink.
7.  Cut Scallop Oval from Peach Parfait scrap; adhere greeting scallop on top; adhere all to card using Dimensionals.

Friday, October 21, 2011

I love butterflies

Here is another card from this class and again, love the creativity of punch art!

1.  Fold Poppy Parade cardstock in half.
2.  Adhere So Saffron Stripe Designer Paper strip to Night of Navy strip; adhere to card front as shown.
3.  Adhere Baja Breeze piece to Night of Navy piece; adhere to card front close to the left side.
4.  Stamp greeting from Pennant Parade stamp set on Whisper White scrap using Night of Navy ink; cut out using small pennant on Pennant Builder punch.  Add to scallop pennant; trim edges to form border.  Punch holes in each corner; use Linen Thread to make hanger.
5.   Cut 4 scallop pennants from Poppy Parade scraps.
6.  Cut 4 straight pennants from Just Add Cake Designer Paper scraps and adhere to Poppy Parade scallop pennants.  Adhere to Baja Breeze square to form wings as shown on sample.
7.  Use Word Window punch to cut out body from Peach Parfait scraps; adhere to wings using Dimensionals.  Draw antennae using Black Stampin’ Write marker.

Thursday, October 20, 2011

You know Dasher and Dancer....

Here's another great card from my friend Kimmy's class.  There is something so creative about punch art.  I think it's mostly b/c I look at this and think....who in the world thought this up?  I want to be them one day :)

Putting supplies would be redundant so I'll just post the directions for this card.


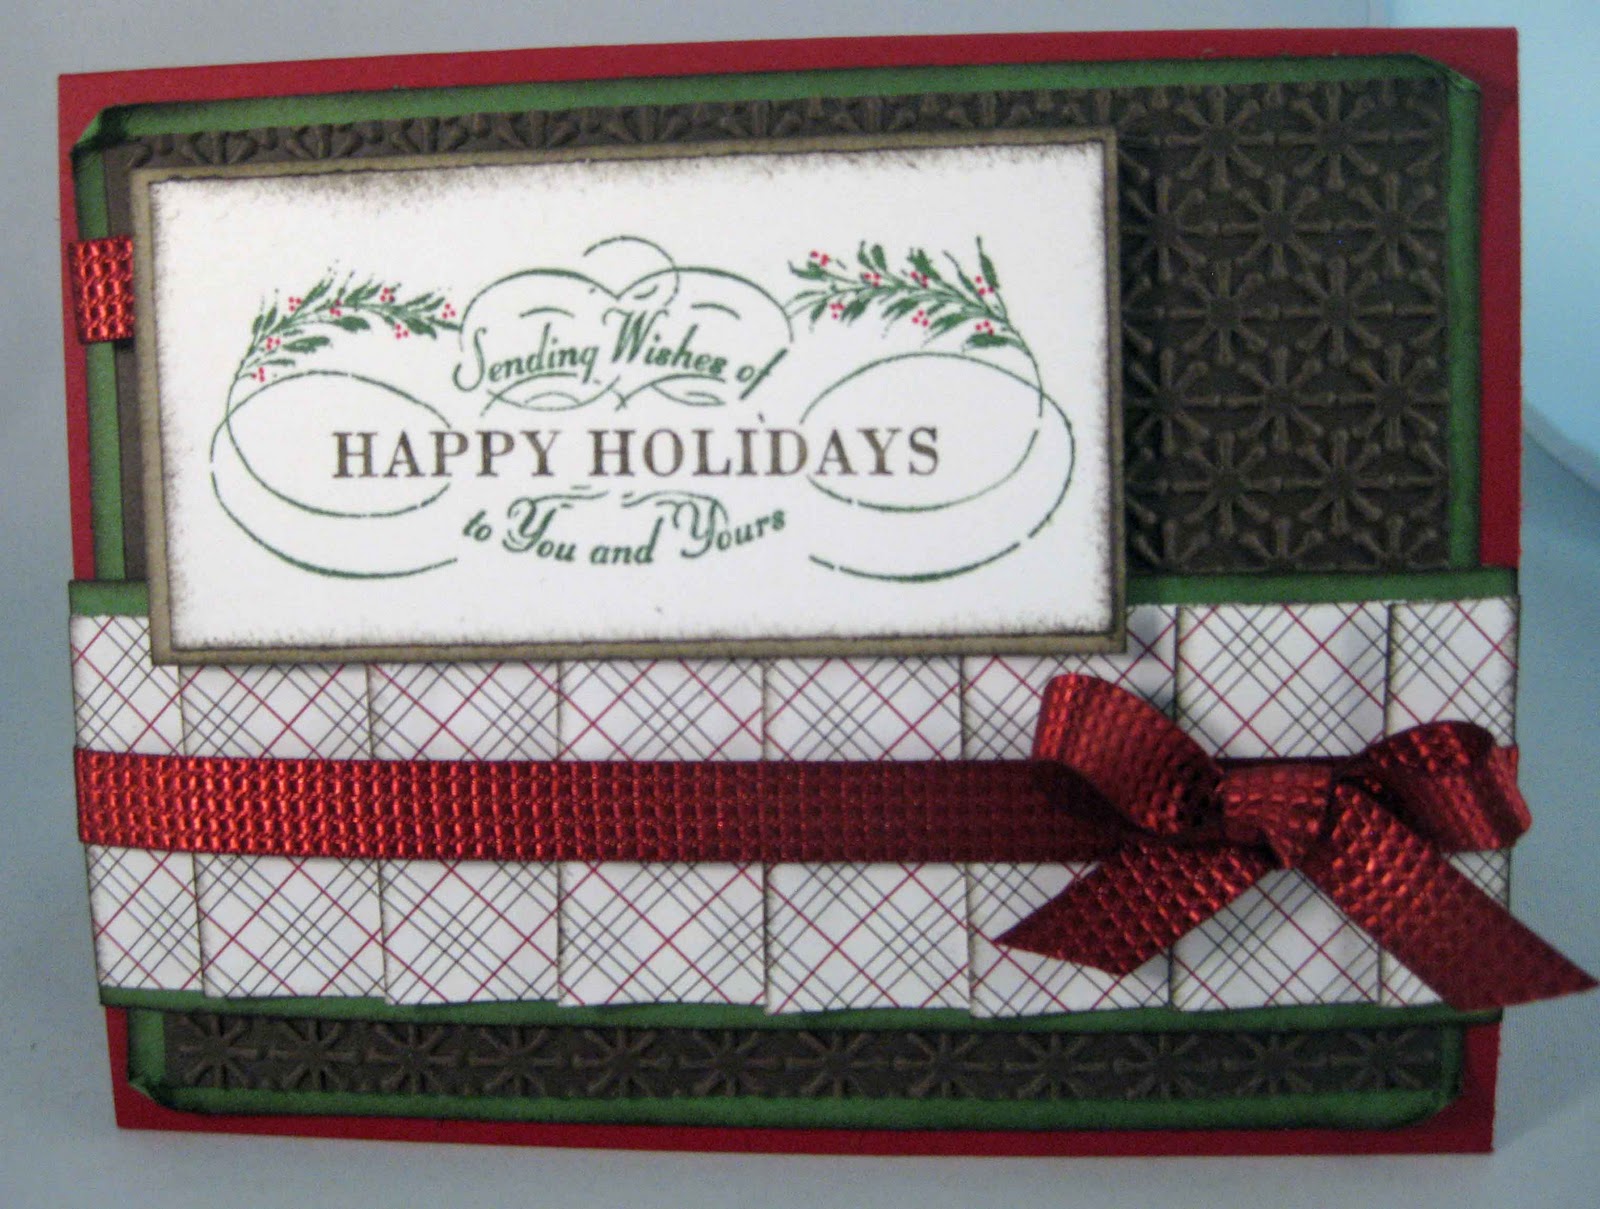
1.  Fold Chocolate Chip cardstock in half.
2.  Using Big Shot and the NEW Snow Burst Embossing Folder emboss the large Naturals Vanilla piece.
3.  Using Sponge Dauber and Real Red ink add ink to the front of embossed Naturals Vanilla piece.
4.  Adhere to large Crumb Cake piece; tie ribbon around and adhere to card front.
5.  Sponge edges of small Naturals Vanilla piece using Sponge Dauber and Chocolate Chip ink.
6.  Adhere to Old Olive piece; adhere to card front as shown on sample.
7.  Stamp greeting on Crumb Cake scrap and cut out using the Modern Label punch; sponge edges with Chocolate Chip ink.  Punch out 3 small circles using an office hole punch; add highlights using white pen and glue on as shown.  Adhere to card front using Dimensionals.
8.  Reindeer:
            a.  Antlers – cut 2 branches from the Two-Step Bird Punch out of Chocolate Chip                     scraps
            b.  Head – cut 1 scalloped pennant using the Pennant Builder punch out of  Chocolate Chip scraps.  Stamp pennant using Crumb Cake ink on Crumb Cake scraps and cut out using straight pennant from the Pennant Builder punch.  Adhere to scalloped pennant.
            c.  Ears – Cut 2 wings out of Crumb Cake scraps using the Two-Step Bird Punch; sponge edges using Chocolate Chip ink; adhere to head as shown in sample.
            d.  Eyes – Use Office hole punch to cut circles from Chocolate Chip scraps; add highlights using white pen; adhere to head as shown using Glue Pen.
            e.  Hair -  Use Boho Blossoms punch to cut small flower from Chocolate Chip scraps; cut in half and add to top of head.
            f.  Nose -  Cut small circle from Real Red scraps and adhere to face.
            g.  Adhere antlers using glue pen; adhere face to card front.        

Wednesday, October 19, 2011

More Fun with Pennants

One of my best friends, Kimmy, and great downline invited me to this fun class using our Pennant punch and Pennant Parade Stamp Set.  I couldn't wait to make them.  She made a take home kit for me and I made them immediately.

On a side note, it's people like Kimmy who make being a demo so fun.  The friendships I have made over the last 7.5 years including customers is the best part about doing an in home biz!  If you are looking for the same kind of camaraderie and a way to support your stamp habit, don't forget about October's promotion!  The month is already half way over.  So, let me know soon!  You will also get an exclusive stamp set to go with your starter kit!
I digress :)  Here's today's card.
Supplies
Stamp Set: Word Play
Paper: Real Red, Garden Green, Bashful blue, whisper white
Ink: Real Red, garden green, bashful blue
Tools: Pennant punch, jewelry tag punch, modern label punch
Accessories: real red 1/4" grosgrain ribbon, sponge dauber, dazzling details (but I should have used rhinestones.  I didn't see them in my bag when I was making it.  Sorry Kimmy!), glue dots, dimensionals


And with Kimmy's permission...directions to make this great card!

1.  Fold Real Red cardstock in half.

2.  Sponge edges of Bashful Blue piece using Bashful Blue ink; adhere to card.
3.  Tear one edge of Whisper White strip and adhere to card front (add adhesive only to the bottom so that you can add the fence posts).
4.  Fence Posts:  Cut 8 tags from Whisper White scraps using the Jewelry Tag punch.  For each post glue 2 tags together and add to card front; adhere small white strip being sure to cover joints in the posts.
5.  Tree:  Cut 3 scalloped Pennants using the Pennant Builder punch from Garden Green scraps; sponge edges using sponge dauber and Garden Green ink.  Adhere pieces together as shown to form tree shape.
-For Trunk use Modern Label punch and cut from Chocolate Chip scrap; adhere to tree
6.  Adhere tree to card front; add Real Red bow to top of tree.
7.  Stamp greeting from Word Play stamp set using Real Red ink. 

Tuesday, October 18, 2011

You HAVE to get one!!

You are gunna be soooo jealous!!!  Look what I just got!
I officially feel organized...Now I just have to label each dauber with the right color to keep them organized :) If you'd like to get one, go to JoyFull.stampinup.net.  They are $14 and I am thrilled to have it!!

Monday, October 17, 2011

Bridge Tallies

I will have to say that the new set, Gently Falling, in the holiday mini catalog has to be one of my favorite sets ever!  You are going to sick of seeing all the projects using this set.  My mom's friend lives up in the N. GA Mtns and wanted a leaf theme.  What do you think?  I did case this from Lynn Pratt..so I can't take the credit ;)
Supplies:
Stamp Set: Gently Falling
Paper: Pool Party, Soft Suede, Spice Cake DSP, Whisper White, 
Ink: Soft Suede, Pear Pizzazz, More Mustard
Tools: scallop border punch, paper piercer and mat pack, 1/16" hole punch, sponge dauber
Accessories: natural hemp

Sunday, October 16, 2011

Christmas Lodge through the window

Well, after 7 beautiful cards using our Christmas Lodge Stamp Set, I hope you all wishing you could get this set. But, many of you are saying, Beth, those were all great, but I just don't have all the supplies you have.  Well, today's card was designed just for you!!  Happy Stampin!
Supplies:
Stamp Set: Christmas Lodge
Paper: Always Artichoke, Early Espresso, Whisper White
Ink: Always Artichoke
Tools: Big Shot, snow burst embossing folder
Accessories: dimensionals, cherry cobbler quilted ribbon

Stamp tree on a 4.5"x3" piece of white.  Then cut down the middle and then at 1.5 along the sides.  Each square is 1.5" x 1.5" :)  This is so pretty in person...and very easy and quick to make :)

I saved the best for last :)

Saturday, October 15, 2011

More Christmas Lodge

Here is the other card from the Class in a Flash that didn't make my card class cut.  See what you think.  The original house was colored green, but have you ever seen a green lodge?  maybe...  This is another masking technique that just didn't work for me.  Maybe you guys could do better :)  I enjoyed making it very much though.
Supplies:
Stamp Set: Christmas Lodge


Paper: Crumb Cake, Cherry Cobbler, Whisper White, Frostwood Lodge DSP


Ink: Cherry Cobbler, early espresso, garden green


Accessories: Post it note, cherry cobbler quilted ribbon

Friday, October 14, 2011

More that didn't make the cut :)

This was one of the cards I bought from the Class in a Flash Tutorial.  I enjoyed making it, but something just wasn't right about it.  I wanted it to work for me, but it just didn't.  What do you think?
Supplies: 
Stamp Set: Christmas Lodge


Paper: Garden Green, Crumb Cake, Early Espresso, Whisper White, Frostwood Lodge DSP


Ink: Garden green, early espresso, cherry cobbler


Accessories: cherry cobbler quilted ribbon, dimensionals

Thursday, October 13, 2011

Christmas Lodge at Night

This is an amazing card that uses the masking technique.  It didn't make the cut for my card class b/c it didn't match the others....isn't that sad?
Supplies: 
Stamp Set: Christmas Lodge, Four the holidays


Paper: Night of Navy, Whisper White, post it note


Ink: Night of Navy, Daffodil delight


Tools: Big Shot, snowflake embossing folder, circle scissors plus


Accessories: dazzling details, dimensionals, dauber

Technique Tip: Stamp lodge image on white piece of paper.  Stamp the image again on a post it note.  Cut it out as close as possible from the post it note.  Cover the image on the white sheet and then sponge the rest.  Then cut out the circle.  If you want to add the yellow moon (the original card left the moon white.  I probably should have done that), punch out a 3/4" circle and place under post it note before you sponge around the sky.  I hope that makes sense.

Wednesday, October 12, 2011

Frosty Christmas Lodge

Supplies: 
Stamp Set: Christmas Lodge


Paper: Early Espresso, Crumb Cake, Frostwood Lodge DSP


Ink: early espresso, cherry cobbler, white gel pen


Tools: circle scissors plus, square punch for banner ends, paper piercer for brads


Accessories: brads, cherry cobbler quilted ribbon, dimensionals


I cased this beautiful card from Debbie Currier.

Tuesday, October 11, 2011

More Christmas Lodge

Do you have to have this set yet?  I hope so!  The beautiful tree is obviously the favored stamp in this set.  You can do so much with it!  I didn't emboss the tree on this card, but you could use our wild wasabi embossing powder on this for extra wow!
Supplies:
Stamp Set: Christmas Lodge


Paper: Cherry Cobbler, Garden Green, Wild Wasabi, early espresso, whisper white, frostwood lodge dsp, cardstock vellum


Ink: garden green, early espresso, black stazon ink, cherry cobbler (sponged around white piece)


Tools: Itty bitty punch pack, paper piercer and mat pack, curly label punch, ticket corner punch


Accessories: cherry cobbler quilted ribbon, basic pearls

Monday, October 10, 2011

Christmas Lodge Easel Card

Ok, this card rocked my world!  This was a part of the tutorial I bought from Class in a Flash.  Unfortunately, I only loved 2 of the 4 cards so I had to keep searching for my class cards.   This one could easily be your photo card this year.  Just replace the embossed tree and replace it with a picture of your family.  I might do that for my closest family.  These are NOT mass production cards :)  I just love how the little jingle bells hold it up like an easel.
Supplies:
Stamp Set: Christmas Lodge


Paper: Cherry Cobbler, Garden Green, Crumb Cake, Early Espresso, Frostwood Lodge DSP


Ink: versamark, early espresso


Tools: Heat Tool, square punch (to make the ends of the banner easier to cut evenly)


Accessories: NEW pewter embossing powder, cherry cobbler satin quilted ribbon, mini jingle bells, dimensionals, daubers

Sunday, October 9, 2011

Christmas Lodge Week

Here is my first Christmas Lodge card.  It might be my favorite b/c of getting to use my new simply scored tool!
Supplies:
Stamp Set: Christmas Lodge


Paper: Cherry Cobbler, Garden Green, Early Espresso, Whisper White, Frostwood Lodge DSP


Ink: Garden Green, Early Espresso, Cherry Cobbler


Tools: Big Shot, snow burst embossing folder, simply scored tool, sponge dauber


Accessories: Cherry Cobbler quilted ribbon, dimensionals

Saturday, October 8, 2011

Fun at Regionals

Every other year, SU! makes a point to get closer to us in the South for a half-day regional.  2 years ago we went to Chattanooga and today the Southern Inkerbelles took the short trip down to B'ham for this year's regional.  We learned a crazy amount of techniques and did swaps with tons of other demos.  Our heads were exploding when we left!  Here are some highlights!
These girls are the reason I keep stamping!  I love being with them and they are all so excited about this craft we love so much!  Allison, Gretchen, Carol, Dominique, Stephanie, Kim, Shatze, Judy and I am in the middle :)  We were the only group to have matching t-shirts.  I loved being dressed the same as my friends...it just meant we went together!

It was announced that for the next 2 weeks in addition to the free big shot when you join, you will also get a special stamp set that they showed us.  I don't have a way to show it to you, but it is adorable!  Should I tell you that I get the set too if you join?

There is no better time to join!!


Here is one of the make n takes we did.  I accidentally erased the picture of the other one.  They were fun to make!


Here are a few of my favorite swaps.  I won't go into detail, but if there is something you can't figure out, just email me :)


What a great afternoon!  We caravanned (sp?) down, ate lunch together and enjoyed each other's company.  We all got 2 additional free make n take projects to make at home in addition to our new card box that you can find in our mini catalog.  I'll be excited to make mine.  Dominique even won our new stocking set through the prize patrol!!

So, if you have ever thought about doing this, we'd love to have you in our fun little group.  With each new person, it only gets more fun!  Maybe you could go to the next one with us!

Christmas Lodge

When I first saw this suite of products at convention, I was very underwhelmed.  I didn't care for the plaids and the old timey feel of them.  But....as usual, the amazing demonstrators of stampin' up have proven me wrong again.  Not only have I purchased all the products in this suite, cased a whole class using them, but have 9 people coming to my class on the 15th!!  I hope this is a turn around for attendance :)
These 4 cards along with 3 others have kept me busy over the last few weeks.  Can't stop looking online for more amazing samples using our Christmas Lodge stamp set and our frostwood lodge DSP!

Starting tomorrow, I'll be sharing these 7 cards with you.  Please dont' forget about all 4 exciting promos going on in the Stampin' Up! world this month!  Click on pictures to the right to learn all about them.


Would you be interested in an online PDF tutorial for this class or would you be more interested in watching a video on how to make each card?  Even if you don't want either...which do you think I should do?

Friday, October 7, 2011

Matchbox Die

Well, once I bought the adorable candy wrapping stamps, It's a Wrap, I had to get our big shot die to cut out the perfect size box to put them in.  I demo'd this at my last workshop.  So fun!
Supplies:
Stamp Set: It's a Wrap
Paper: Whisper White, Pumpkin Pie, Window Sheet
Ink: Pacific Point,  Real Red, Daffodil Delight
Tools: Big Shot, Matchbox Die, vintage wallpaper embossing folder, crease pad
Accessories: stampin Dimensionals, old olive 1/4" grosgrain ribbon

It's hard to see, but I have used a window sheet to make the cover for the box.  Why would I want to hide those adorable wrapped nuggets?
You can see the embossing a little better here.  The box really looks plain w/o a little pizzazz!
Then, it fits 4 little hershey nuggets right inside.  I stamped the cake image again and cut it out and put it on top with a dimensional.  I think this really turned out cute :)  I might have to get the holiday version of these candy wrappers :)

Thursday, October 6, 2011

Quick Gently Falling

Last week I did a demo for my friend Toni.  I had to show this gorgeous stamp set, but I didn't want to overwhelm new stampers with all my layers and tools.  So, I found this one online and it was PERFECT!  Please forgive my little mistakes at the bottom.  I didn't have time to make another one.  I have noticed lately with the die cut stamps, I have to take a baby wipe and wipe around the edges.

Supplies:
Stamp Set: Gently Falling, Perfectly Penned
Paper: Whisper White
Ink: More Mustard, Pool Party, Pear Pizzazz, Soft Suede


I did want to dress it up a little though...couldn't help myself.  I lined the envelope.


I cut a piece of Spice Cake DSP into the usual 5.5 x 4.25.  I pushed the paper down into the envelope until the top of the paper touched the tip of the flap. Them I cut the excess DSP off the edges and glued it on.  A really neat way to make a simple card pop a little.

Wednesday, October 5, 2011

New Christmas Lane Class

I'm so excited about this class. I have used our Simply Scrappin' Christmas Lane kit to create all these projects. We will be making 5 cards, 6 tags, a present bow and a candy treat box.  This class will be Sunday Oct 23rd at 1pm and will cost $30.  RSVPs by Oct 12th, please :)

This promises to be a really fun class.  If you didn't get my evite for this class, please respond to the blog email and I will add you to my evite :)

Tuesday, October 4, 2011

Wedding cards

Ok, enough fabric and halloween...there are other things going on in our lives.  My cousin's daughter got married so I had to whip this up :)  Very fun!

Supplies:
Paper: Blushing Bride, Basic Black, Whisper White
Tools: Big Shot, elegant Lines embossing folder, corner rounder, itty bitty punch pack, scallop border punch
Accessories: basic pearls, glue dots, 3/8" white taffeta ribbon

Monday, October 3, 2011

Hope and Strength

Supplies:
Stamp Set: Strength and Hope, fabulous phrases
Paper: River Rock, Basic Black, Whisper White
Ink: River Rock, Basic black
Tools: Scallop trim border punch
Accessories: dimensionals, 5/8" organza ribbon

Sunday, October 2, 2011

Clearance Rack Restocked!!

Hey everyone!  Just found out our clearance rack was just restocked!!!  Click on this icon over in the right margin to shop at a big discount!

Cookie Stamps?

Well, just when you think SU! has thought of everything, they have come out with the cutest idea EVER!  Cookie Stamps!  These silicone stamps fit great on the end of a very classy handle to make what I think is the best impression I have seen on a cookie!  These impressions are as crisp as our embossing folders, if you know what I mean!  I made some for my last bow class!  Drew helped.
This set comes with all 3 holidays along with the beautiful wooden handle.  Very easy to use especially for a child.

The package even comes with recipes for shortbread and sugar cookies.  These images will be distorted if you use them with a recipe that has some kind of leavening in them.  So, shortbread was perfect!


This is the perfect teacher's gift.  Whip up a batch of these, throw them in a cellophane bag and include her very own cookie stamps.  They are only $16.95 and are now available.  Do you HAVE to have them?  I know what Drew's teacher will be getting this christmas!

And, the cookies are guaranteed to be gobbled up asap!