Wednesday, June 27, 2012

Squash Fold Card

Like I said yesterday, several of the Southern Inkerbelles got together last week for a fun swap.  The parameters were a little weak, but I told them not to make a normal card...add something extra.  Here is what I made.
Supplies:
Stamp Set: Bright Blossoms, Word Play
Paper: Summer Smooches, White, Real Red
Ink: Real Red, Lucky Limeade
Tools: Big Shot, NEW fancy fan embossing folder (you have to get it!!), 1" and 1-1/4" circle punch, decorative label punch
Accessories: New daffodil delight stitched grosgrain ribbon, dimensionals, basic rhinestones


But remember I said it needed to have a little pizzazz?  
Here ya go!!

BAM!!!

Supplies:
Stamps: Delightful Dozen
Paper: Summer Smooches DSP, Island Indigo, Real Red, White, Pool Party, Limeade
Tools: Big Shot, label framelits, 2.5", 1/2", 1" circle punches, blossom builder punch
Accessories: in color designer brads


Here is the link to Debbie's blog to show you how to fold the squash part!! 

Monday, June 25, 2012

Card Kit of the Month Club

I've been doing this gig for 8 years now and I keep getting different excuses why people can't come to a class.  I have finally decided to take the plunge and bring my services to you thanks to the Postal Service!!

Starting July, I will be starting my Card Kit of the month Club!  This is a 6 month commitment lasting July-December.  If you have ever said any of these things, this club is for you!!

"I don't have time to come to your home."
"I'm just not creative enough to do it."
"Do you have kits available for these cards?"
"I'm out of town, wish I was closer."
"I wish I could just make your cards on my time."

Well, here you have it!

For $30/month, you will receive in your mailbox everything you will need to create 6 cards including a fully assembled clear stamp set and 1 marker.  3 designs, 2 cards each.  In addition, you will receive envelopes and directions with a color picture.  Everything will be cut for you and ready for quick assembly.  This is a great gift idea for anyone in your life.  Aging mother, daughter, or a friend who needs a creative outlet.  So, even if you aren't interested, a gift subscription to this mail order club, would be the perfect present!

The fun is you won't know what you will get to make until it arrives in your mailbox.  I will need to have your check or PayPal payment by the first of each month.  That will give me time to order products, cut and ship to you by the 15th of the month.  At the end of the year, you will get a special gift with your December card kit for fulfilling your commitment:)

Just to get you excited (but only this month will I share beforehand.).  The July Stamp Set will be Bright Blossoms and here is one of the cards you will get to assemble.  Due to the nature of this club and the people I want to reach, these cards will be simple, but elegant.
Simple Tulip

Because I am sharing this news a little late, I will accept your commitment through July 9th.  Please contact me if you are interested in this awesome opportunity!  Wood Sets Available as well for a little extra.

Downline Fun!!

I must admit, my favorite gathering of the quarter is with my Inkerbelles!  Finally after 8 years of loving this job, I have really cool, sweet, and talented friends who love doing it with me!  And, I get paid a little bit too :)  Can't beat that!  I am the kind of person who stays in her own little box.  I love it that my friends all have different styles and likes so they open my eyes up so I can appreciate all types of styles. Our personalities are all very different, yet I love each one of them!  I even have some adopted girls who come to my meetings!  Bigger the better I say!  I couldn't say all this and not remind you of the awesome June special for new demonstrators!

In 8 years, I have only seen a handful of times when it was cheaper to join this amazing company!  It is now $99 to join which is a steal compared to all the other companies out there! But did you know you can completely customize it now?  No longer does the company dictate what you need to start your biz or hobby :)  That is so fun!!

 You also will receive $50 of extra product to add to your already incredible stash! 
Make a Cake Clear-Mount Stamp Set
Make a Cake Stamp Set
Patio Party Collection DVD
Patio Party Digital CD

Patio Party Designer Series Paper
Patio Party DSP


So, that said, would you like to be one of my Inkerbelles?  I'd love to have you!!  Stay tuned for a big announcement from the Inkerbelles coming later this week.  And...I'll be sharing all the swaps from our meeting!

Wednesday, June 20, 2012

Sweet Press Cookie Stamps

It's been a year now since SU! came up with this adorable idea to add stamping to the kitchen!!  I have perfected this product after a year of messing up.  I wanted to share a few tips with you so you will realize how fun these little guys are!

Step 1:  The product comes with 2 recipes that have been tested for reliability.  It gives you a sugar cookie and shortbread recipe.  I find the shortbread works best for me.  Mix the ingredients, but you will most likely need to add more flour.  Try to get your dough to look like this.  Not sticky at all.  Chill for about 10 mins...no longer...gets too hard.

Step 2:  Ok, a few things going on here!  I am using a wood cutting board.  Generously sprinkle flour over the work surface of the board.  I decided to get a rolling pin that was smooth not wooden.  It helps give a smoother roll.  Make sure you rub the pin with flour too.  Can't use enough flour in this project :)

Step 3:  After you have decided which design to use, press the stamp part directly into a bowl of flour.  This will keep it from sticking to the dough and keep dough out of the crevices.  Firmly press the stamp into the dough.

Step 4:  I have obviously decided to cut out my cookies.  I was so tired of seeing the smooth edges of the cookies in the catalog that I had to figure out a way to do it myself.  I found a set of round cutters at Michaels and one of them fit perfectly!  I cut out the dough and put it onto my stone.  Now, if you don't want to cut out your cookies, roll your dough into balls and put on cookie sheet, then press firmly with the stamp.  Just make sure to dip your stamp in flour first!  Remember...can't use enough flour!

Step 5:  Stamp as many as you can fit on the rolled dough.  I did just a few at a time.  My board wasn't that big :)

Step 6:  So here they are waiting to be baked.  See how perfect they look??

Step 7:  All done!  Let cool.  These got a little brown around the edges...watch your clock.  Ovens vary :)

Step 8:  These cookies were made using the rolling ball method.  I forgot to take a picture of the PERFECT ONES!!  I have always feared fondant, but I wanted them to look pretty so I tried it.  You can buy blocks of colored fondant.  I got mine at Michaels and thought the pink would make pretty flowers.  Pinch some off the block and roll just like we did the cookie dough.  The smooth rolling pin is especially important when rolling fondant.  Don't want to get grain marks in it.  Press the stamps on the fondant and cut out like you did the cookies.  Use a spatula to put on each cookie and VOILA!!!!  For extra adhesive, add some icing or melted chocolate under the fondant to make it stick.  That's just if you feel like an over achiever.  It might also balance out the unappealing taste of fondant...why does something that pretty taste that yucky?

I hope you will get crafty and try this new product!!  We have even added a new set with the new catalog!!  Here they all are!
Holidays Sweet Pressed Cookie Stamps Occasions Sweet Pressed Cookie StampsSpecial Events Sweet Pressed Cookie Stamps

Tuesday, June 19, 2012

No Open House

Just wanted to get the word out that I will not be able to have the open house this weekend.  Just can't get a second to get this house in order long enough to sit and figure all this out.  Hopefully in July!!!

Friday, June 15, 2012

More love in the mail!

I don't have a direct upline, but I do have a direct stampin' "grandmother".  Julie sent me this adorable card to congratulate me on a great month.  It is so simple b/c I know she made a bunch. It means a lot, b/c I don't get very many stamped cards.  That's the life of the stamper....it's ok!  So, thanks, Julie, for sending me this adorable card!

Wednesday, June 13, 2012

Decor or not?

We are just now getting more settled in our new home.  I do love all the stampin up products that I can use to make home decor!  I love making girly things for my daughter and this one turned out really great!  I haven't finished the other letters yet, b/c there's no place in her room now that it is decorated.  So, not sure what to do with it now?
Supplies:
Paper: Pink Pirouette, Early Espresso, White, Melon Mambo
Tools: Designer Rosette die, alphabet die (retired), large scallop circle die, beautiful butterfly die, big shot, polka dot embossing folder
Accessories: hot glue, basic rhinestones, dimensionals

Tuesday, June 12, 2012

Square Quilt

I got this cute one from Mary Fish.  I can pick her cards out from anywhere.  They all have the same feel to them and I love them!  This is using the 1 inch square punch.
Here's everything you need to know about this card from Mary.

Monday, June 11, 2012

I'm home

Ok, I'm actually home from the beach now, but wasn't sure I would have time over the weekend to post something ready for today.  So, again, doing this ahead of time.  New catty soon!
Supplies:
Stamp Set: Perfectly Penned
Paper: White, Daffodil, Old Olive, Real Red
Ink: Real Red
Tools: Simply scored tool, punch pack
Accessories: basic pearls

I've seen this done lots of ways now.  You can do it with your diagonal plate or just your standard simply scored tool just with the paper rotated.  I didn't do mine just right, but you get the idea.

Friday, June 8, 2012

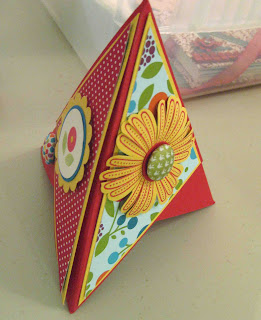
Pyramid Card

I love this cool pyramid card.  I love how it folds down to fit in a standard envelope, but then folds up to stand nicely on a table!  You should try it!

Here's the tutorial by Stampin' Year Round.

Thursday, June 7, 2012

Quilt Card

I loved this card I found on someone's blog.  I am terrible at writing that down and then I forgot to give anyone credit!  Here is my disclaimer!  I only CASE cards, I rarely design my own.  If I did, I promise you'll know it:)
Supplies:
Stamp Set: Family Reunion, Summer smooches set :)
Paper: White, summer smooches dsp, real red
Ink: Island Indigo, real red, limeade
Tools: Big Shot, tulip frame embossing folder, top note die, decorative label punch
Accessories: Real Red satin ribbon (retired), adhesive sheets

Wednesday, June 6, 2012

Old butterfly punch

I loved this card and I hate it that you can't really see the embossed window sheets on top of each butterfly.  I know this is the old punch, but I'm sure the new one would work here too!
Supplies:
Stamp Set: Perfectly Penned

Ink: Razzleberry
Paper: rich razzleberry, tempting turquoise, lucky limeade, real red, summer smooches DSP
Tools: butterfly punch (retired), big shot, polka dot embossing folder, scallop border punch
Accessories: limeade baker's twine, window sheets, dimensionals, daffodil pom poms

Tuesday, June 5, 2012

Stamp Club

Every month I read tons of blogs from fellow demos, save the ones I like, make the ones I love, then share them at club!  I try to get lots of different kinds.  This week I am at the beach.  So, I had to do this week's worth of posts ahead of time.  You should be wondering why I'm not all giddy about the new catty and it's only b/c I had to do this early!  I'll be really excited next week :)  I can still send you a catty in the mail for $5 anytime.
Supplies:
Stamp Set: Fabulous Phrases
Paper: Blushing Bride, Whisper White, Twitterpated DSP
Ink: Black
Tools: Big Shot, Polka Dot embossing folder, modern label punch, word window punch, owl punch
Accessories: basic pearls, dimensionals, blushing bride pleated ribbon

I love this card b/c it uses the owl builder punch for the little dresses.  I just free handed the hangers after I glued the dresses on.  The one I saw like this used the baby onesie wheel for the hangers.  Much cuter, but I didn't have that wheel :(


Monday, June 4, 2012

The Barn

The birthday party for Katie was so much fun!  Instead of traveling 4 hours with a homemade cake, I decided to make cake pops for her party.  Pig ones at that!   Here is the barn I made to match her invitations inside the styrofoam "grass" that the little piggies were standing in :)  There were lots of kids at the party and everyone, even the adults were thrilled with them!  Very easy to make!


Yea!!  Piggie Pops!

Friday, June 1, 2012

New Promotions!!


And for my hostesses this summer!!!

New Catalog!!!

OK, here it is!  I'll be surprised if there is one person out there who hasn't seen it yet, but just in case....here it is!!!  Click on it to be sent straight to the PDF of this awesome catalog!  At anytime I can send you one of these in the mail for only $5 so just let me know!


I have just put my order in for a few items.  The first thing I did was sell all my old ink pads and bought the new ones!  They are so beautiful and ink up so well!  You won't believe the difference!

SAVE THE DATE!!!!
Open House at my new house on Saturday June 23rd!
Come check out the new catalog, make some cute projects and be nosey and look around my new house.  Mail me for my address if you don't know it!  You will also have the opportunity to sign up for upcoming clubs starting in July (regular club and christmas card club).  I am also wanting to offer a digital studio seminar over a few months and wanted to get some feedback about that!

Happy Shopping!

June 23rd 1:30pm


Squash Book

I think this was my favorite album from the 6 weeks.  Since we just moved and my son had his first 6 years in our old house, I thought it would be fun to create an album so he can remember the house he grew up in.  I took pictures of all the most popular rooms in our house along with pictures of his first 6 birthdays.  I wish I had one of these from my childhood!


Here is one tutorial on how to make this album.