Monday, January 31, 2011

2-Step Owl Punch


Here is what I did with my Mojo Monday today.  As I said earlier, I will be focusing on the 2-step owl punch this week.  Here is what the punch looks like again.


Once again, I am a bad judge of product.  I wasn't interested in this punch until I saw some pretty incredible things done by other demos.  I'm such a follower :)  Here is a video to teach a few of the elements from today's card.


Supplies: 
Stamps: Teeny Tiny Wishes
Paper: Early Espresso, Whisper White, Bashful Blue, So Saffron, Cajun Craze, Always Artichoke, More Mustard (beak)
Ink: Early Espresso (pad and marker)
Tools: Big Shot, scallop circle die, circle scissors plus, 2-step owl punch, 2-step bird punch, word window punch, modern label punch, gel pen
Accessories: sponge daubers, dimensionals

Mojo Monday 176


YEAH!!  It's my favorite Stampin Day!  This week I am focusing on the adorable 2-step owl punch.  I'll try to use it with my mojo today.
Stay tuned for what I come up with :)  If there is a product you'd really like to learn how to use, please let me know and maybe I can incorporate it into one of my weeks.

Sunday, January 30, 2011

Wanna be a demonstrator w/o the committment?

What are the reasons you won't take that next step to becoming a Stampin' Up! demonstrator?  It's probably the money.  Well, would you like a free trial?  This is the perfect time.  If you join now...

You get the Starter Kit (Standard or Digital+) for 15% off --that's over $310 worth of SU! products for just $148.75....FREE SHIPPING!!!


You get a bunus bundle (worth up to $50) on top of the fabulous Starter Kit to get you off to an awesome start.


But, here is the best thing of all!   If you join now, You won't owe SU! anything until June 30th.  And, if by then, you decide this is not for you, you can just let your demonstratorship fall off and you will have no obligation to SU!  So, you can be a demo for 5 months to see if it fits you!!  Now is the best time to join!

I've been doing this for 7 years and I get more excited about it every year.  I'd love to share my excitement with you :)  Please contact me if you'd like to take advantage of this trial run!

Saturday, January 29, 2011

Last Card using Artistic Etchings

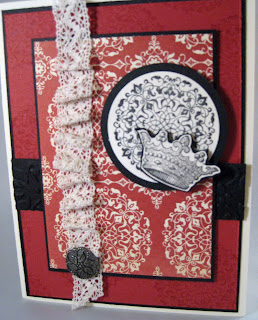
Here is the last card from Angela McKay's Artistic Etchings Class Planner.  She did an incredible job creating these cards.  I enjoyed making them :)  Nothing tricky about this card.  You can refer to my scrunchy ribbon tutorial to see how to make this ribbon.  I will mention maybe the vanilla ribbon would look nicer on this card.  I just didn't have any at the time.  

Supplies: 
Stamp Set: Artistic Etchings
Paper: Basic Black, Riding Hood Red, Very Vanilla, Love Letter DSP
Ink: Riding Hood Red, Basic Black
Ribbon: 5/8" black satin ribbon (or vanilla)
Tools: Big Shot, Vintage Wallpaper embossing folder, scallop oval punch, small oval punch
Accessories: vintage brad, dimensionals

I hope you enjoyed all these cards using our Artistic Etchings Stamp Set.  I'd love to order you a set.  Don't forget to check out our current promotion: Sale-A-Bration

Friday, January 28, 2011

Are you feeling an "artistic etch" yet?

Here is a very simple, elegant card from Angela McKay's Artistic Etchings Class Planner.

Supplies:
Stamp Set: Artistic Etchings
Paper: Very Vanilla, Basic Black, Love Letters DSP
Ink: Riding Hood Red, Basic Black
Ribbon: 1-1/4" striped ribbon
Tools: spritzer tool with black marker

Thursday, January 27, 2011

More Artistic Etchings Cards


Here is another card made using Angela McKay's Artistic Etchings Class Planner.  Again, when I saw our new crochet trim ribbon in the catty, I wasn't impressed.  Boy, I'm not a very good judge when looking at the pictures.  I love it now!  Here's a quick video on how to scrunch this type of ribbon.


Supplies: 
Paper: Riding Hood Red, Basic Black, Very Vanilla, Love Letters DSP
Ink: Riding Hood Red, Basic Black
Ribbon: 5/8" victoria crochet trim
Tools: Big Shot, vintage wallpaper embossing folder, 1-3/4" circle punch, circle scissors plus for a black 2" circle
Accessories: antique brads, dimensionals, sticky strip

Little video tip for this card.

Just wanted to share one more thing about this card.


Wednesday, January 26, 2011

A"mour" artistic etchings ideas

 This is my favorite card from Angela McKay's Artistic Etchings Class Planner.  I think the reason I love it the most is b/c of the tasteful trim die.  What a great product!  I also love the fact that the trim has been embossed, sponged AND THEN spritzed with a black marker.  Love the attention to detail.

Supplies: 
Stamp set: artistic etchings
paper: riding hood red, basic black, very vanilla, Love Letters DSP (designer series paper)
Ink: basic black, riding hood red, basic black marker for spritzing
Tools: Big Shot, tasteful trims die, sponge dauber, spritzer tool, scallop oval punch, medium size oval punch, vintage wallpaper embossing folder
Accessories: thread, basic brads, dimensionals

Tuesday, January 25, 2011

Roll Tide!!


As promised, here is the University of Alabama Bag I made using our Love letters DSP.  Click here for a previous post showing all the supplies needed to make this bag.  When you live in Huntsville, and SU! makes a houndstooth designer paper...it's a match made in Heaven.  But...no..I'm not an Alabama fan :)  Go Paladins!!

Sale-A-Bration is here!

Today is the day we have all been waiting for!  Sale-A-Bration is here!  Get some coffee and sit at the computer and check out these beautiful sets SU! is offering this year!  Click on this picture in the sidebar.
Here's how Sale-A-Bration works:

SpendWhen you spend $50 on Stampin' Up! merchandise, you'll receive a free Sale-A-Bration reward. There's no limit--for every $50 you spend, you can select another FREE Sale-A-Bration reward!
HostWhen you host a workshop of at least $300 (before tax and shipping), you'll receive a free Sale-A-Bration reward in addition to all of the regular hostess benefits!
JoinDuring Sale-A-Bration, anyone who joins as a demonstrator gets 15 percent off the price of the standard or Digital+ Starter Kits--that's over $310 worth of high-quality Stampin' Up! products for just $148.75! In addition, new demonstrators get a FREE Bonus Bundle worth up to $50! To take advantage of this special, limited-time offer, contact me today. 


Bonjour from Paris :)

Last week I focused on Valentine's Day cards.  I hope you enjoyed that.  This week I will be showing you cards I made using our Artistic Etchings Set.  It has a romantic Paris sort of feel to it.  This is one of those stamp sets that did not catch my eye in the catalog, but after I saw this Class planner offered by Angela McKay, I had to have it.  The items you will see this week are the ones we made at my stamp camp last Friday night.   If you are in N. AL check my calendar to see when my next class is.


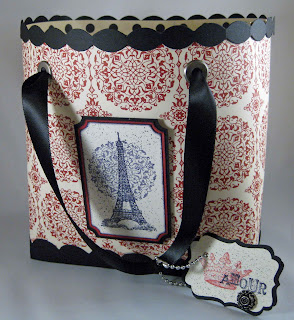
Here is the adorable purse we made.  I especially love the dog tag :)  If you own a Big Shot, I highly recommend getting our Tasteful Trim Die.    It was used to make the trim on the top and bottom of the bag.  You'll see it again on another card this week. 
 For all of you Alabama Fans, this designer paper has a houndstooth pattern in black and white and with our Riding Hood Red paper, you could make the most adorable Alabama Bag.  Let me know if I can help you make it! I'll see if I can make one this week.

Here's a quick video on how to layer using our decorative label punch.  I said in the video it was the modern label punch.  I was wrong...sorry :)


Supplies:
paper: Very vanilla, riding hood red, and basic black cardstock, Love Letters DSP, 
Ink: basic black, riding hood red, basic black marker
Ribbon: basic black satin ribbon
Tools: tasteful trim die, crop-a-dile, ticket punch, decorative label punch, sponge daubers, scoring blade, spritzer tool
Accessories: jumbo eyelets, antique brads, dimensionals, chain (home depot)

Monday, January 24, 2011

My Mojo Monday 175


Man, there is nothing like putting the kids to bed and hiding out in your craft room in total silence as you let your imagination take over.  I am soooo proud of this card.  My customers tell me all the time, "I loved my cards so much, I couldn't send them to anyone."  Well, I understand those feelings very well.  I tried to incorporate Mojo Monday with this week's stamp set, Artistic Etchings.

I cannot get away from our Love Letters DSP.  The Riding Hood Red, Basic Black and Very Vanilla are so beautiful together.  It lends itself to a vintage look and that it what I went for here.  Some key elements to this card are the sponging and the distressing of each piece.

There is a lot going on here.  I basically used a dauber on everything here.  I embossed each image with black embossing powder and used the heat tool to set it.  It adds a little shine.  Once I cut each piece out, I sponged the edges and distressed them with my paper snips.  I even dirtied up the ribbon so it wouldn't pop too much.  On the black scallop, I spritzed it with our stampin' mist and crumpled it up as tight as I could and then flattened it out.


In this picture, I'm just showing you all the dimension.  The "ribbon" across the front is buckled up a bit and I tried to tie that in with the buckled greeting above it.


And finally, I had to throw in the crown somewhere.  So, I stuck it inside on a distressed piece of paper.


Supplies: 
Stamp Set: Artistic Etchings, Teeny Tiny Wishes
Paper: Riding Hood Red, Basic Black, Very Vanilla, Love Letters DSP
Ink: Basic Black, versamark, early espresso to distress
Ribbon: 1/8" black ribbon, 5/8" vanilla satin ribbon
Tools: Heat tool, 1-3/4" circle punch, 2-1/2" circle punch, 2-3/8" scallop circle punch, paper snips
Accessories: sponge daubers, dimensionals, glue dots

Please don't forget to check out the Sale-A-Bration catalog in the morning!  Tonight is your last chance to get our Filled With Love Bundle.

Mojo Monday 175


Take a moment (or several) for yourself today and create something you're proud of using this Mojo Monday Sketch 174.  This week I will be focusing on our Stamp Set Artisitc Etchings.  It's one of those sets that didn't catch my eye until I saw what another stamper did.  I purchased an online class from Angela McKay and you will see all she taught me to do with it.  It is one of our cheaper sets at a low price of $14.95 :)  I'll also be spending today doing my Mojo Monday with the same set.  Here is one sample I posted a few weeks ago using Artistic Etchings cased from Lynn Pratt.


Today is the last day to purchase our Filled with Love Bundle.  Wouldn't you love to make some of the cards I showed you last week?  Here is one more I cased from Krystal (SKDELEEUW) using Filled with Love.

Supplies: 
Stamp Set: Filled With Love
Paper: Whisper White, Regal Rose, Filled With Love Bundle DSP
Ink: Pear Pizzazz, Regal Rose
Ribbon: Pear Pizzazz stitched poly ribbon
Tools: 2-3/8" circle Scallop punch, 1-3/4" circle punch, curly lable punch, 1" circle punch, med oval punch, dotted scallop ribbon border punch, paper piercing tool and mat
Accessories: bitty buttons, pearl, dimensionals

Get excited about tomorrow!  Our annual promotion Sale-A-Bration begins and last til the end of March.  For every $50 you spend with me, you will get to choose a stamp set from our mini catalog.  Grab a cup of coffee and check out this year's fabulous sets!  Tomorrow, click on this picture in the sidebar and decide which one you'd like sent to your home.

Sunday, January 23, 2011

Please vote for your 4 favorite cards for my next Stamp Camp.

Hello.  I have 7 cards made up for a hostess stamp set camp.  I can only do 4 and wanted anyone who follows this blog to please vote for 4 of them.  Keep in mind that time is a factor and there will be new stampers there.  Pick a good assortment :)  Leave your votes in the comment box at the bottom please.

#1 Punch Potpourri

#2 Silhouette Sentiments

#3 Birthday Bakery

#4 Apple Blossoms

#5 Because I care

#6 Fast and Fabulous

#7 Long Fellows
Thanks for helping me!

Doesn't have to be pink and red

Here is one final card cased from Mary Brown.  It is using the same set we have been using all week, but you don't HAVE to use it only for Valentines.  I think the ribbon I used on this card was too big, but it was all I had in the right colors.  Go here to see Mary's great ribbon tying tutorial.  So, if you case this card, use a lighter ribbon.  This one is too heavy for such a sweet card.  BUT...PERFECT TO PUT IN MY 8 MONTH OLD DAUGHTER'S HAIR!!!  I'll be making that tomorrow.

Supplies:
stamp set: filled with Love
paper: pear pizzazz, chocolate chip, whisper white, so saffron, baja breeze
ink: pear pizzazz, choc. chip
accessories: perfect polka dots embossing folder, pear pizzazz stitched poly ribbon, choc corduroy brad (was on clearance), bitty buttons, oval die, small heart punch, word window punch, modern label punch, dimensionals 

DO YOU HAVE TO HAVE IT???!!!

Saturday, January 22, 2011

No Stampin' Required but Cuteness Guaranteed!

It's always so exciting to get something free in the mail.  Especially when it is stamp related.  SU! sent all the demonstrators a free sheet from our Love Impressions rub ons found in the new occasions mini.  I have always felt valued as a demonstrator for Stampin Up! and when they do these random acts of kindness and thanks, I feel so loved!  So, I have to use them and share them with you.

To wrap up the week of Valentine's cards, here are 2 cards I made using the rub ons.  They were cased by Sherri Barron and Angie Leach and embellished upon to my liking :)


I am wondering how many people follow these types of blogs, but don't have the money to buy all the products needed to make them.  There are guys who drool over pictures of cars only knowing the purchase of said car is just a pipe dream.  Well, those of you who are on a fixed craft budget, rub ons are perfect for you.  It requires no ink and no stamps.  A great place for beginners to start.  Let me help you get your new passion started.  Here's a quick video on how to use rub ons.

Supplies Card #1:
Paper: basic black, whisper white, real red DSP (either in the bold brights assort pack or in the Filled with Love bundle)
Ribbon: 5/8" white satin (scrunchy ribbon tutorial)
Accessories: scallop border punch,real red glitter brad, rhinestones, love expressions rub ons


Supplies for card #2:
Stamp set: Filled with Love
Paper: real red, pretty in pink, going gray, whisper white
Ink: real red
Accessories: 5/8" real red grosgrain ribbon, rhinestones, dimensionals, love expressions rub ons, dotted scallop ribbon border punch, perfect polka dots embossing folder

Friday, January 21, 2011

Give Kisses this Valentines

Sorry for the fuzzy photography.  This is the last project I purchased from Mary Fish.  To give you more perspective, you could fit 2 or 3 hershey kisses in it.  It is made using 4 punches from our petal card punch.  I was so grateful to Mary for sharing this project b/c it made me dust off my punch.  I had been having the hardest time with that punch.  I couldn't get a clean punch and the embossing was weak.  The trick with this punch is to put it on the table and using force on the top of the punch instead of squeezing it like the others. It works pefectly everytime and coordinates with our cute by the inch stamp set.

Have you decided you have to have the Filled with Love Bundle?  If so, just click on current promotions on the right and have it sent straight to your house :)  Valentine's Day 2004 is when I attended my first Stampin' Up! Stamp Camp.  I was so proud of what I had made for my family.  I never looked back!  I'd love to make your Valentine's Day filled with love and crafting....

Thursday, January 20, 2011

To whom are you sending Valentines this year?

Here is another card from the online tutorial I bought from Mary Fish.  She does such beautiful work.  Keeping up with what other people do gets me out of my comfort zone and that can be scary sometimes.   I am an A2 girl.  For those of you who don't know that term, it refers to the standard size card.  5.5"x4.25".  Even having the card open up instead of to the side doesn't happen that much.  This card took me out of the zone.  The original size is 6.5"x6.5".  Such a neat size and we sell envelopes to fit.  Way to go, SU!  Now, if you would please lower the price of them, I'd really appreciate it!  The envelope store in my town just went out of business and all the stores around are too expensive.  Oh well.


Do you love the bitty buttons I have been using?  You could get them free with our Filled with Love Promotion 

I love the bitty buttons.  SU! also makes punches to coordinate with them so you can add a piece of color behind them.  I don't have those yet so I put the color on top.  Check out yesterday's post to see the video.  If you cut a sliver of cardstock, you can tie it through the button and ta da!  I love it!


Supplies:
Stamps: Filled with Love
Paper: Real Red, Old Olive and Whisper White
Ink: real red and old olive ( I used our markers)
Accessories: Scallop Rectangle Clearlit (for the big shot), bitty buttons, mini library clips (the one in this picture is retired)

Wednesday, January 19, 2011

Are you Filled with Love?

I love Valentine's Day!  I love making cards for the people I love and for my son's friends.  This cards has so many neat things about it.  Let's see if I can tell you about it in a video.  I'll try and do better with my filming.


Tuesday, January 18, 2011

The Perpetual Folding Card

If you are a demonstrator, you have probably received your February issue of Stampin' Success.  I was particularly excited about the new card design they shared.  It's called a perpetual folding card.  I'll show you what I mean.  The pictures in the issue are good, but you'll need to go to the pattern library, choose cards and then it's #17.  Print out the dimensions and that will help.  Well, if you go to the online version of Feb's issue, you can watch a video on how to make this card.  It's one of the online extras.  That was very helpful to see it in full action.  Here it is for those of you who don't have access to our website.  (wouldn't you love to have access...you can join my family and see it for yourself :)  Ok...nevermind. SU! won't let me post it.  So, I'll have to tell you about it in a quick video.  But, here are the 4 folds of the card.

front of card


Here is the front of the card.  I am trying to use up my Filled with Love bundle paper. 
Stamp Set: Filled with Love
paper: whisper white, pretty in pink, Filled with Love DSP
Tools: large heart punch, dotted scallop ribbon border punch, pretty in pink epoxy brad (retired), crochet flowers (retired), perfect polka dots embossing folder

Fold #2
Here is what it will look like when you fold it back.  All I used on this was more DSP.
Fold #3
Stamp set: Filled with Love
Paper: Filled with Love DSP, whisper white, old olive, real red
Ink: old olive, real red (markers)
Tools: scallop rectangle clearlit, small heart punch
Final Fold #4
Here is the last fold;
Stamp set: filled with Love
Paper: filled with Love DSP, whisper white, pretty in pink
ink: real red
Tools: Alphabet simple letters for the big shot, crochet flowers (retired), real red glitter brads

This took me all day to make.  So, don't think you're going to be able to just whip this one up.  Here's a quick video on how it works.

Joy Fold Card


Happy Tuesday!  I hope you had a chance to play around with the Mojo Monday Sketch.  I'll be showing you what I came up with on Friday.  Remember, this week we are focusing on our Filled with Love promotion.  Today's card has a special fold.  It's called a Joy Fold card.  Basically, it's a card inside a card.  I learned about this from a tutorial I purchased from Mary Fish.  If you don't want to purchase anything, here is another great tutorial on the joy fold card.

Monday, January 17, 2011

Mojo Monday 174

Not another scallop trim border!!
WOW!  That is so theraputic.  I'm always working so hard to make cards for my stamp camps that I never really sit down and create something so ornate.  This is a VERY busy card, but something about it says, "I love you".  I just don't know who to give it too.  My husband might gag :)  I thought I would tie in today's Mojo Monday with my theme for this week...
VALENTINE'S DAY!!  
I hope you can sit down this week and focus on yourself.  Just use what you have and then be proud of it.  The DSP (designer series paper) used in this project comes from our filled with love promotion.  The best thing about the paper is you can use it all year round.  Pink and Red can be used on anything.  So, this promotion doesn't become irrelevant after February 14th. 


Here's a reminder.
 Supplies: 
stamp set: Filled with Love
paper: whisper white, pretty in pink, real red (sliver in button), Designer Series Paper Patterns Love

ink: real red, early espresso (sponged around edge of white)
Tools: paper piercing tool, 2-3/8" scallop punch, 1-3/4" scallop punch, scallop trim border punch, beautiful butterflies die, beautiful wings embosslit, perfect polka dots embossing folder, bitty buttons, small heart punch, dimensionals, epoxy red brad (retired), pink pirouette ribbon (on clearance rack), library clip (available on clearance rack), corner punch, 


Tips on making the card:

Check an earlier post for a video tutorial on how to make the scallop trim border squares and rectangles.  The flower was inspired by the February Stampin' Success.  Pick whatever size scallop circle punch you have.  Punch out 7 scallops.  I actually spritzed them with a solution (1/2 water, 1/2 rubbing alcohol) to break down the fibers.  I then crumbled them up as tightly as I could and then carefully flattened them out.  Using the paper piercing tool, pierce through all layers and put a brad through to hold them together.  Then, fluff them up as tightly or loosly as you like.  Ta-Da! 

I did have to cut through 1 scallop on the trim to get the ribbon to fit through.  

I also added a sliver of real red cardstock through the button.

I think that's it!  Thanks for checking in.  It's a Valentine's week so I hope you are in the mood for love...